Showing posts with label DIY. Show all posts

Monday, February 23, 2015

Basement Induction Brewery Build - Brew Stand

As I mentioned at the beginning of 2015, I am finally putting the wheels into motion here with my indoor home brewery. To transform my basement into the induction run brewery I need to completely the following projects:


This past weekend, I tackled the brew stand.

Plans


Brew stand plans
(Brew stand plans)


Build

I don't seem to ever follow directions or plans 100%.  This project was no different.  I decided to dado out a 1/2" of the 2x3 dimensional lumber to hopefully increase the rigidity of the stand.  If I didn't do this the square frame, and later all my wort and mash weight, would be solely relying on #9 deck screws to hold everything up.  I, like most other homebrewers and DIY'ers, love to over build things so the screws alone may have been fine, but I felt comfort knowing some of the weight would be resting on the vertical 2x3.

2x3 verticals
(2x3 verticals with 1/2" dado)


I failed to account for the 1" decrease caused by my impromptu dadoes so the side-view of the plans above is actually 22" inches overall, and 19" between the verticals. RDWHAHB!  Everything fits in the end.

Brew stand frame
(Stand Frame)


After pre-drilling and screwing in the horizontal pieces for the burner-level of the stand.  I cut a plywood shelf, with notched corners, and fastened it down to the 2x3s with a few 1 5/8" drywall screws.

I then cut the 3 pieces for the open-ended top square and fastened them with the deck screws.  I did my best to try to keep everything in square, but the 2x3s had warped a bit since purchase.  This probably didnt' matter as I later found out the area of the basement I planned to put the brew stand is not even close to being level.  Oh well!  I placed a tiny shim under that front right leg and all is well.

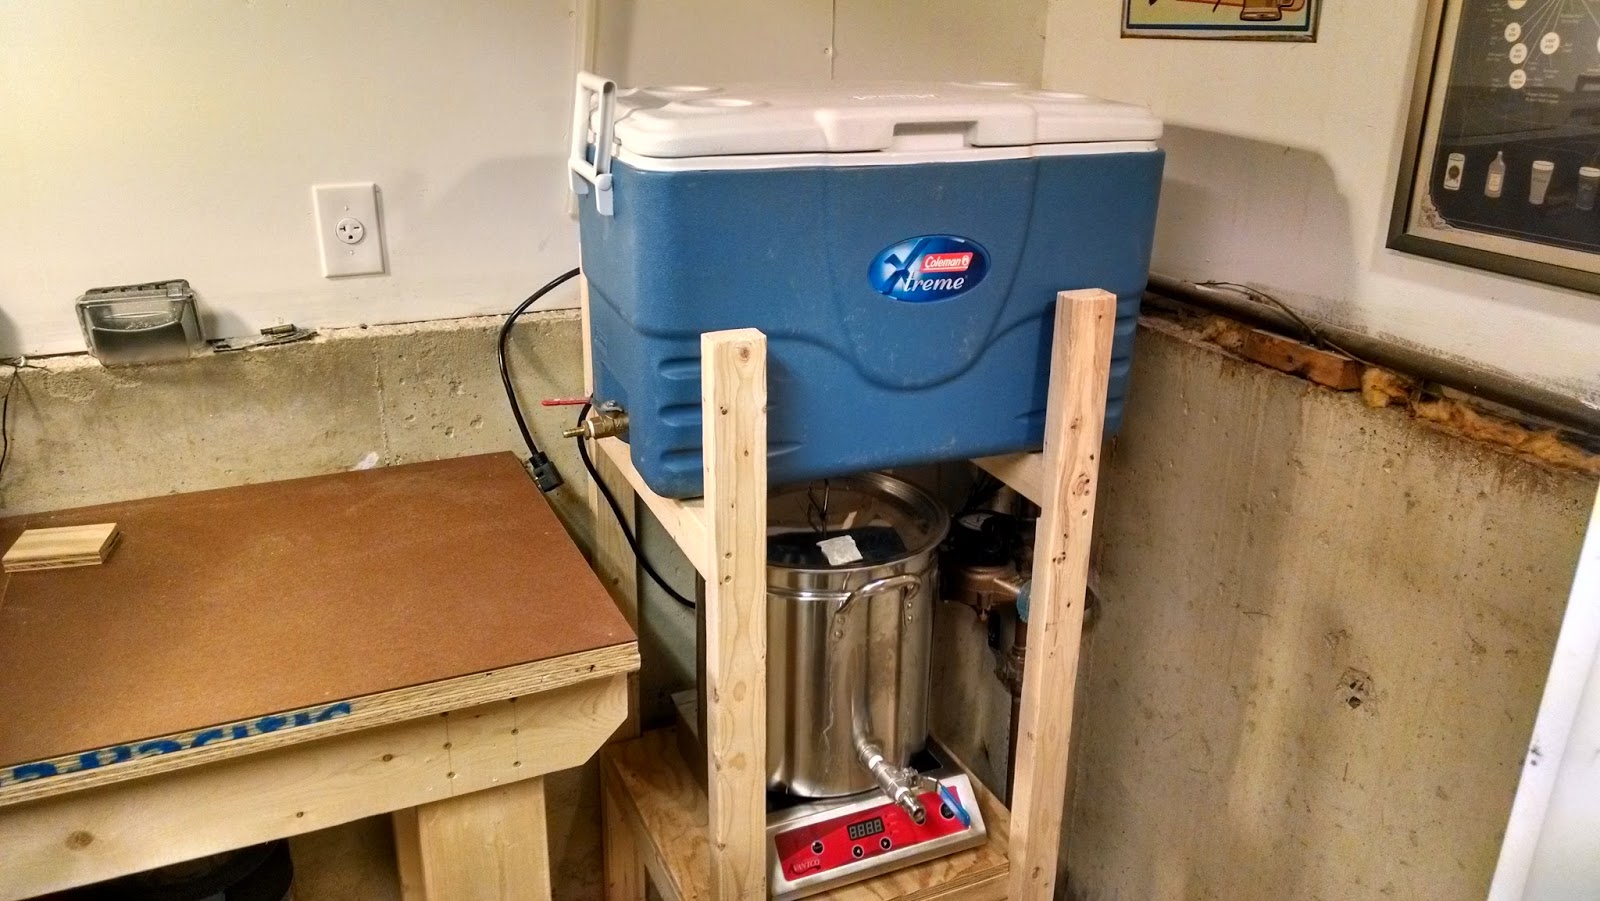
Hypothetical Brew Day Pictures

Here are some pics with things in place and testing out different hypothetical brew day procedures.

Hypothetical mash mode
(Brew stand - hypothetical mash mode)

Hypothetical sparge mode
(Brew stand - hypothetical sparge)
Hypothetical boil mode
(Hypothetical boil)
Kettler to fermenter
(Hypothetical draining wort to fermenter)

(Brew stand next to the bench - storage mode)

Future tweaks


I think I may cut the top of the front two vertical pieces shorter in the future.  I would have done it, but I had already swept up the basement of all the sawdust and didn't feel like repeating process.  They are at the height they currently are just cause I had had the guy at home depot cut them in half for transportation purposes.  I can image it will be easier to move the mash tun with grains for cleaning if I shorten those pieces.

I am probably going to stain or apply some sort of finish to the wood mainly to protect it from moisture and spills.  Being made out of wood, I will be able to easily adapt the stand in the future if I ever go with a pump or RIMS setup, but I think this will work fine for now.

Stay tuned as I hope to tackle plumbing a new utility sink and water lines next.

Friday, February 13, 2015

Brew Thru #2 - Workbench

Time flies, doesn't it?  Already in February of 2015 and things are plodding along nicely.  In the second Brew Thru I will be talking about some Social Media Updates, my first Homebrew Wednesday, recapping the Superbowl, and my workbench.

Social Media and Homebrew Wednesday

So I have recently learned of this Homebrew Wednesday (HBW) thing going on over on YouTube.  It is pretty cool and equally dorky at the same time = right up my alley.  Homebrewers record updates for their brews, brewdays, or just anything related to their homebrewing and post it up on Wednesdays.  I just launched my first HBW video as the debut of the Shegogue Brew YouTube channel.  Be sure to subscribed to stay on top of all things Shegogue Brew.

I also have launched a Facebook Page for you to 'Like.'  If you are an avid FB'er you can stay in touch that way.  Considering twitter...but I am not a huge fan...we will see.


Super Bowl Recap - The Welker's first Homebrew

Most of us gather to watch the Superbowl.  It is the time of year I  look forward to as another reason to continue - my birthday usual falls the week before the superbowl - eating good-tasting, but bad-for-me foods like these ham and cheese sliders, and seven layer dip.  My wife and I had our friends, whose namesake claims the Witty Welker, over to enjoy the game.

The Welker's have caught the brew bug and brought over their first batch of homebrew!  Its always interesting being on the receiving end of other brewers first batch.  They are usually worried I won't like, and watch my first sip with bated breath.  No worries necessary though as the beer was excellent!  They made a Brewer's Best Weizen and it was delightful.  They didn't remember which yeast was used (I'm letting the lack of note-taking slide this time you two!) but it favored my weizen preferences of a stronger clove phenol, over banana esters.  The only real things I could knock the beer for was its clarity and that it was a little thin in the mouthfeel.  We will ignore the clarity by claiming this a kristal weizen.  The thinner body made for a very easy drinking beer.  Once again, well done!

Then there was the infamous Budweiser commercial.  I am not going to link to it since I don't want to promote AB-InBev.  I think they are horrible stewards of the beer industry, but not because of the commercial.  If anything I was more disappointed that they didn't come up with something funny - though I guess that is saved for Bud Light commercials - remember the one about ten years ago where the guy only had enough money for the 6-pack of bud light or toilet paper?  He ends up choosing the Bud Light and when asked by the cashier if wants paper or plastic, he promptly states paper.  Now, that is a good commercial!  This year's defensive stance against craft beer and its drinkers just goes to show they are really starting to feel the pain of continued declining U.S. sales OR they are marketing genius's and trying to drum up sales for their newly bought-out Elysian Brewing's pumpkin beers!


Workbench

Until recently I didn't have a workbench.  I had a set of plastic sawhorses (real cheap) which broke, so I made a sturdy 2x4 set which I utilized for the deck project and they work great, but they are rather bulky and remain outside for use on bigger projects.  I was in need of a multipurpose workbench.  It will be used for anything and everything.  Here are the build pics:

lumber in corolla
Just barely fit in my toyota corolla.  2'x6' is plywood cuts is about all that would fit

dimensional lumber laid out
All the lumber laid out, changing my saw blade

cuts to lengt
Cuts made - I found one really nice knotted piece of 2x6

clamping
Can never have too many clamps - using this setup to keep the cross piece flush

close-up of joinery
Used one screw to hold together so I could drill a 5/8" hole for the oak dowels

bench legs
The legs

precise cuts
Pretty precise and accurate cuts there

another dowel joinery pick
Another view of the dowel joinery. Oak dowel glued with Titebond II

Cutting Dadoes
Cutting the dadoes on the apron to prevent racking on the legs

Dadoes finished
Dadoes cut and chisseled out (I need better chisels if I get into woodworking)

One side attached to legs
One side together

Second side added to legs
Second side added

Table without top
Bench frame all set to go!

Bench almost complete
Almost Complete!  Two sheets of 3/4" BC grade plywood screwed ever foot
Unfortunately, even though the plywood was grade BC, it was providing quite a few splinters.  I decided to pick up a few sheets of tempered hardboard.  I got 1/8", but probably should have gotten 1/4" time will tell.  I drilled a tiny hole so I could counter sink the thin tack nails.
Nails in masonite hardboard
Tack nails holding tempered hardboard down

Finished Workbench
Finished!
I based the bench build off of the quick workbench from woodgears.ca/workbench/, but used 2x6 for the legs and the top cross-piece. This was secured with two 5/8" dowels and glue on each side. I used a 2x4 on the bottom of the legs and two 1/2" dowels glued.  The apron rails are 2x6s with six 2" screws on each leg connection.  I also finally installed the 48" powerstrip above the bench for quick-access.  As Tim "The Tool Man" Taylor would say, "More Power!"

Now to build the brewstand!


Friday, January 30, 2015

How fast is fast? Optimizing Your Existing Immersion Wort Chiller

I built my wort chiller four years ago.  I purchased a 50' roll of soft 1/2" copper tubing and four 90 degree elbows for about $69.80 + $13.63 shipping.  I then had to purchase soldering equipment (lead free solder and flux) and brass garden hose fittings.  So I was probably in about $100 or so for my wort chiller build.  When I got around to constructing it I only used about 40' of the tubing due to a height restriction on the vessel I was using to form the circular structure.  I still need to figure out what to do with the rest of that copper tubing!


Fast forward to 2015, and I am kind of surprised to see that the prices of copper today are actually less than they were in 2010.  In fact, the site I purchased my materials from even carries packages specifically for immersion chillers!

For a while I thought my immersion chiller was just not as good as some of the commercial products out there.  I would see products advertising 5 minutes to get to pitching temps… 5 minutes!  I was immediately filled with envy as I recalled that last brutal brewday of the summer.  You know, those 90 degree days where incessant stirring for 20+ minutes only gets you down to 78 F.  I thought it was just my crummy chiller, but as with all things in my life I began to thoroughly research the issue at hand.

I Googled for any information and product reviews I could find on wort chillers.  I saw a lot of people with a similar dilemma give up on their immersion chiller and go with a counter-flow or plate chiller.  I was also aware of Jamil Zainasheff's recirculating whirlpool system.  All of these seemed like wonderful options.  Unfortunately, they too, all seemed to have flaws.  The biggest of these flaws to me was that a pump was required (I don’t own a pump).  I kept researching and was really intrigued by the JaDeD Brewing chillers.  Their chillers post some crazy fast chill times with the Hydra boasting a 3 min chill to 68*.  Okay, this is some sort of brewing magic, right? Do you need to sprinkle special chilling dust at flameout to achieve these results? The answer: Nope!  JaDeD provides insight to this sorcery by explaining the science behind fast cooling.  To paraphrase, it is essentially the input chilling water flow rate and wort movement which dictates how fast you can chill.  Yes, the temperature of your source water can make a big difference, but that wasn't the component I was lacking.

I have always had good wort movement - I stir the heck out of it as I am chilling.  However, I, for some silly reason thought if I turned my spigot on only halfway or even a trickle, that I would somehow be extracting the most heat possible from the liquid?  Not sure how I came up with that inaccurate idea.  Maybe, I figured running the water through too fast wouldn’t fully utilize that volume of water's potential? Or maybe I was just drunk.  Either way, I now feel like such a bonehead.  Keeping cool water flowing through your immersion chiller
REAL fast and keeping the wort moving (to avoid hot and cold spaces) is what results in fast chilling.

The next brewday when it came time to chill, I opened up that spigot full bore and “let 'er rip.”  Boy was I surprised to  be within 10* of my groundwater temperature within 5.5 minutes.  Now I don’t feel so insecure about my immersion chiller, and I can get back to brewing some great beer.  I invite you to learn from my mistakes and make the most of your wort chiller - if it aint broke don’t fix it!

How do YOU chill your wort and why?  Let me know in the comments below!


After writing I remembered reading a post on Brulosophy a while back where Marshall tested using a pump to recirculate vs his (and my method) of moving the chiller all around.  Spoiler alert, manual beats mechanical.

Saturday, April 7, 2012

Cheap Hopper Extension for Barley Crusher

I purchased a Barley Crusher almost 2 years ago.  It is a great addition to my all grain brewing equipment.  The crusher allows me to store grain unmilled, thus preserving freshness.  The mill also allows me to not rely on or worry about estimating efficiency from a homebrew store.  When I made the purchase, I was to frugal to spend the extra $15-$20 to get the 15lb Hopper.  It the grand scheme of things, it is not a huge deal to have to pour half your grain and mill, stop, and the pour the other half.  But it would be nice I thought...

After putting my thinking cap on I figured, why not just make one myself out of cardboard?  I had a couple of boxes in the garage from online shopping and some SWEET Colored Duck Tape my mom had given me for my birthday!  I measured and the hopper was not a perfect square.  It was about 8"x8.5" - Just so happened one of my boxes was 8x8x12.  I cut the 8 inch sides and left the folded part.  The folded pieces would be cut on an so they would lay flat on the angled parts of my current 7lb hopper (see the picture to follow what Im saying).  I then cut the 12" sections to 8.5" leaving the flap as well.  Then I taped it all up and placed in the hopper to make taping adjustments.  The design assumes that the weight of the grain on the flaps will keep the hopper in place... I have NOT test this yet :)

(Extension laying flat for easy storage)

(extension on top of 7lb hopper)

The Extension itself its 8"x8.5"x8" which comes out to 544 inches cubed.  A pound of barley takes up about 46.2 inches cubed.  So this roughly gives the extension a capacity of  ~11.77 lbs (544/46.2).  So to be safe we will say my total hopper (original 7 lb hopper and extension) can probably hold a total of 17-18lbs.  Most recipes I brew don't come in that high. but I will be sure to test this extension out next brewday and report back.