Monday, March 26, 2012

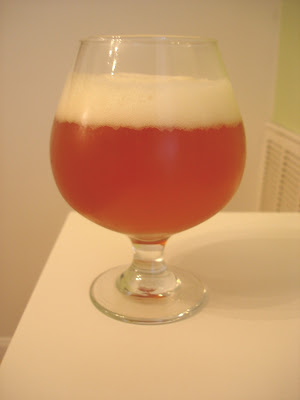
Goose Island - Matilda

This is my first official beer review on my blog.  Hopefully the first of many more to come!  A friend of mine had brought back a sixer of Goose Island's Matilda and was gracious enough to give me a bottle, thanks Tim!  I guess my beer palate is developing nicely as after writing my tasting notes down, I checked the website and a lot of it sync'd up!


Appearance:  Poured with a thick very slightly off-white head.  Deep golden orange, not clear (bottle conditioned)


Aroma:  Sweet Fruit character, like apricots, smell of fresh cloves

Flavor:  Sweet fruit character transitioning to a spicy bitterness.

Mouthfeel:  Moderate - High prickly carbonation leading to a dry finish

Overall:  Belgian beers are not the first beer on the shelf I navigate towards.  But I could see this beer drawing me in again in the future.  For a 7% abv beer, this is a dangerous one.  The beer is really balanced between the sweet fruity notes and a spicey clove.  The beer starts out on the sweet side, but the carbonation and bitterness impart a lingering dryness which requests demands you take another sip.  I wouldn't hesitate to recommend this beer to anyone.

Sunday, March 25, 2012

Going All Grain Series - Part 3 - All Grain Wants

In Part 3 of the going All Grain Series I will talk about Advanced All Grain brewing systems and gadgetry that helps making beer more fun and more consistent.  If you haven't already, be sure to check out: Part 1 - What is All Grain and Part 2 - All Grain Needs

So now you have been brewing All Grain for a while, and you want to be able to accomplish more with your hobby.  Maybe you'd like to make brewday run smoother, quicker, or be able to repeatedly brew the same beer.  The following equipment can accomplish all that, and more!

Brewstands - A brewstand is any contraption that holds your kettle, mash tun and hot liquour tank.  Brewstands can be tiered, with different heights allowing for gravity to do the work in moving the liquid wort from vessel to vessel.  Brewstands can also house all vessel at one height and utilize electronic pumps to move the liquid.  Or a brewstand can be a combo of both.  These stands can be made of wood or metal.  They can come apart of they can be fairly static in their assembly.  There are a lot of options, but they all provide a centralized "Brewery" and can house equipment.  This can help a brewer because they won't have to carry all their equipment and setup every brewday.  A portion of it will be done already.

(Blichmann Top Tier Adjustable Brewstand)


Pumps - 5 gallons of boiling liquid can be a tricky thing to move around.  A lot of brewers utilize magnetic drive pumps like the March 809 to accomplish this.  These pumps are especially handy if you start to make batches in quantities larger than 5.  As mentioned earlier, pumps allow a brewer to keep their brewing vessels at the same height.  A disadvantage to a gravity fed system is the brewer needs to be able to reach the top most point (with a ladder), which is usually the hot liquor tank to fill it.  A Pump can alleviate these problems.  Another use of a pump is recirculating during the mash, which is used on certain systems, or recirculating after a boil which creates a whirlpool effect.  Currently, I don't have a pump and I have to slowly stir my wort to maximize contact with the wort chiller when cooling my wort.  If I had a pump I could let it stir the wort while I clean or get fermenters ready.


Mash Systems - A mash system is used to increase temperature accuracy for a mash.  In BIAB or Cooler mash tuns, there is a decent amount of room for error.  These errors, big or small, can prevent the brewer from producing the exact beer that was imagined when they designed the recipe.  There are two main mash systems which recirculate wort and apply heat to keep the mash a desired temperature.  One systems is called a RIMS ( Recirculation Infusion Mash System) and the other is called a HERMS (Heat Exchanged Recirculation Mash System)
  • RIMS - A RIMS system applies heat to wort as it is recirculated.  The heat is provide either through pumping the wort into another vessel where a burner heats up the liquid (Direct Fired RIMS) or the wort is passed through a tube containing a heating element.  In most RIMS systems a pump is used for the entirety of the mash and the heat application is only applied when the temperature drops below the set range.
  • HERMS - A HERMS system recirculates the wort through a  heater exchanger, such as a copper or stainless pipe which is submerged in Hot water.  A temperature controller is also used in this scenario to determine if more heat needs to be applied to the water of the containing vessel.
These systems also allow for a brewer to do different temperature rests in a mash with ease.  A brewer can to a rest at 144, ramp up to 156 and then perform a mashout to bring the temp to 168.  This is all done by the RIMS or HERMS and setting the temperature controller.  This will also allow a brewer to reach their desired rest temperature every time, which will produce a more consistent product.

Odds and Ends - Generally a brewer will update their system with bits and pieces here and there.  Some will eventually save their hard-earned money for a completely new build, leaving the ole faithful in the dust.  Others will keep doing what they have been doing for years with the "if it aint broke, don't fix it" approach.  It all depends on the brewer and their objects for the hobby.  I am working and saving towards making a brewstand that will allow me to add on here and there with the ultimate goal to make beer quicker and more consistently.  

Tuesday, March 20, 2012

The Brewery

So some of you may be interested in the brewery and my setup, so I thought a few pictures were in order!  Let me know what you think.

The Brew Shelf - The shelf of "Organized Chaos" contains almost all of my equipment other than kegs, kettle and burner!


The Fermentation Chamber - not the most aesthetically pleasing device, but it does its job well.  As the Capacity to hold to Batches at a time.

My "Brewstand" - Making great use of that trashcan for my mashtun.  Forgot to take a picture of my 15 gallon pot.  This is my 5 gallon pot I use for strike water sitting on my propane burner.

My CPVC manifold, which up until last brewday hadn't created a stuck sparge!

One of my kegs and my many cases of bottles

Last, but definitely not least, the Keg/Beer Fridge!

Monday, March 19, 2012

English Mild (11a) Brewday

It was a very successful Saint Patricks Day weekend in the brewhouse.  Friday night I took my temperature controller apart and was able verify all the connections were intact.  I put it all back together and tested it out - worked fine!  So not sure what the problem was, but its fixed.  This allowed me to brew on Saturday.

Brewday was going great until it came time to sparge.  I was trying pick up the speed on my brewday and didn't let the grain rest as long as I should have after stirring before sparging.  Somehow some grain got caught in the 3/8" output of my ball valve and created my first ever stuck sparge!  After some choice words, I put on the thinking cap and grabbed my 3 gallon mash tun that I use for 2.5 gallon batches and started transfer the mash contents into that.  I soon realized that this cooler wasn't gonna hold everything.  So I then started to think again - grabbed my bottling bucket and an old hop/grain bag and poured the rest into this.  My sparging eventually turned it an adulterated brew-in-a-bag, but alas, I collected all 7.5 gallons of wort and brought it to a boil.

(My crush with my Barley Crusher set to Factory Settings)

I remind myself during all this that making wort is not as important as fermentation, so I wasn't worried.  I added my one, sixty minute, hop addition and started cleaning up the mess I had created from sparging.  I hit my desired OG spot on at 1.034.  Siphoned to my better bottle, hit it with O2 and pitched my yeast.  I set the temp conrtoller to hover around 67 degrees F.

I will try to post pictures later, but here is the recipe for now.  I plan on entering this into F.O.A.M's Battle of the Bubbles and BURPs Spirit of Free Beer.  Milds are flavorful low ABV session ales.  This is the type of beer that you can have a few pints on a weeknight and still be able to get everything else you need to get done.

Recipe -  Shegogue Brew - Darth Mild
Style: English Mild - 11a
Batch Size: 6 gallons
Efficiency: 70%
OG: 1.034
FG: 1.010
ABV: 3.1%
Yeast: WLP002 - English Ale Yeast

Grist - Mashed at 152 for 60 mins
7lb - Crisp Pale Ale Malt
8oz - Crisp Crystal 77L
6oz - Crisp Crystal 120L
4oz - Crisp Pale Chocolate

Hops - EKG at 60 mins for 17 IBUs (I had 5.8% AA and use .75oz)

Friday, March 16, 2012

Top of the Mornin' to ya!

I have had a fairly busy week at work and wasn't able to finalize part 3 of my All Grain Series like I had hoped.  I did want to check in and let everyone know what has been going on at Shegogue Brew.
  • Temperature Control Broken - So a week ago I had decided to increase the temperature on my lager for a diacetyl rest.  It was pretty warm last week so I wanted the beer to free rise about 10° F.  I set my temp controller to kick back on when it reached my desired temp.  The warm ambient temperature of the garage allowed the beer to warm up, however my temp controller did not kick on.  It appears something on the controller is not "flipping-the-switch" to provide power to my fridge.  I plan on troubleshooting this weekend
  • Kegged Munich Helles - Due to the temperature controller breaking and the warm weather last week I had to get my first lager into the fridge FAST!  I kegged it up on Tuesday and look forward to enjoying it in a few weeks!
  • Supplies Received - I had a gift certificate to Brewmasters Warehouse.  I bought ingredients for my next beer - An English Mild.  As well as a pound of hops (1/2 Cascade and 1/2 Columbus) for my future testing of my try of a "Session IPA."
So, that was the week in review.  On tap for this weekend I will be trying to fix my temperature controller.  If I am successful then I can brew up that Mild.  I additionally am going to be trying my hand at these DIY Carbonation Caps and possibly making some soda.

Just a friendly reminder to all participating in St. Patricks Day festivities!  Don't Drink and Drive.  It is stupid and not worth the risk.  Be Safe!

Cheers!

Friday, March 9, 2012

Going All Grain Series - Part 2 - All Grain Needs

In Part 2 of my Going All Grain Series we will discuss the equipment that is needed to start making AG beers.  If you missed Part 1 check it out - Part 1 - What is All Grain?

Unlike extract beers, which you do a partial boil and then top-up with water, AG requires you to boil your full volume of wort.  Taking evaporation into consideration, a full boil for a five gallon batch of beer will start off with at least 6 gallons of liquid.  This larger volume of wort causes an instant need for equipment that you may not own, since it was not needed in extract brewing, such as a larger brew kettle and a way to cool 5 gallons boiling liquid.  AG brewing also requires you to mash grains which involves holding the water and grain at a constant temperature for about an hour.

Part 2 - All Grain Brewing Needs

Larger Brewing Vessel - To boil 6+ gallons of wort you will need a brew kettle large enough handle that volume of liquid.  I recommend at least an 8 gallon capacity for 5 gallon batches, and to buy the largest pot you can afford at the time.  There is always some debate between aluminum vs stainless steel, but I will let you figure that out.  I have a 15 gallon aluminum pot.  Here are some of your options:
  • Turkey Frying pot -  These pots generally come in 7.5 gallon volumes and are adequate for full boils of 5 gallon batches. ~$50 on Amazon
  • Tamale Pot - Some International food stores sell these 32 qt (8 gallon) pots for $30-$40.  I have seen them at a local Shoppers Food Warehouse
  • Restaurant Supply - Restaurant supply stores will carry a wide variety and size stockpots in aluminum or stainless steel.  This is the route I went and I purchased through the online vendor Instawares.com.  Price varies on size ~$75 for a 10 gallon and ~$90 for a 15 gallon aluminum pot.
  • Keggle - Legally obtained decommissioned 1/2 Barrel Kegs can be used as brew kettles.  All you need is the right tools and a little DIY to cut to top off.  Price can range from free to $100 or so.
  • Dedicated Brew Kettle - These kettles are generally sold by your Local Home Brew Shop.  They are made of stainless steel and come with ball valves and thermometers attached.  They range from about $200-$400 depending on size.
  • Smaller Batch - Looking to go AG on the cheap?  Don't scale up your brewpot, scale down your batch size!  If you already have a 5 gallon pot you can easily make 2.5-3 gallon all grain batches!
(Me with my 15 gallon brewpot)

Boil, Bringing the Heat - So unless you opted for the "Smaller Batch" option on the kettle size, you will need to be able to bring your 6+ gallons of wort to a boil.  Most household stovetops do not contain the power to do this.  You will need to invest in a new, or additional heat source:
  • Turkey Fryer - This can be purchased in combination with the Turkey Fryer pot Listed above!  This purchase is best made in the days AFTER Thanksgiving when they can be found on sale.  Be careful though - many turkey fryer burners have safety timers that will turn off the burner 15 minutes or so after use and can be a real pain! ~$50
  • Stand-a-lone Propane Burner - Similar to the Turkey Fryer Burner, but purchased separately and without a safety switch.  Do a google search on Bayou burners and you will find  a lot of good products.  I went with a Bayou SP-10.  Caveat: make sure your pot will sit on the burner stand.  Some pots, like keggles, don't have a fully flat bottom and don't sit nicely on some burners.  If this is the case check out the solution over on Hopped Up Brewer ~$50-$100
  • Electricity - Brewers weld low density heating elements to their pots or stick hit sticks into their pots.  If you go this route make sure you KNOW what you are doing as electricity can kill you if you don't know what you're doing.  Check out the heatstick which can be used as a supplement with your stovetop.  Price can be ~$50+
  • Natural Gas - There are special burner heads and adapters to convert or build a natural gas burner.  price can vary greatly

Mashing Vessel - to conduct the mash you need a way to hold the grain and water at a constant temperature for about an hour.  You will additionally need to create a method that will allow you to drain the liquid, but leave the grain.  I won't cover these devices, but they can be had for $10 - $20+ depending on your chosen method. 
  • Brew in a Bag - The Brew in a Bag method has picked up a lot of steam in the past couple of years.  It makes sense since the only additional piece of equipment is the bag itself (disregard that $10+ requirement above).  Read more about BIAB and see if its for you! $5 - $35
  • Beverage Cooler - Beverage coolers aren't just for keeping beverages cold, they are insulated vessels and they can retain heat just as well.  You can get differnet size coolers which will determine the gravity of beers you can produce.  Somewhere around 10 gallon is an average size for most 5 gallon batches. ~$30-$50
  • Separate Kettle - In Part 3 of this series we will discuss Recirculating systems which use another brew kettle to act as the mash tun.

Wort Chilling - It is a lot harder to cool down 5 or more gallons of boiling wort than it was to cool down that 2-2.5 gallons, which was conveniently in a pot that would fit in your sink!  Homebrewers are a pretty smart group of people and have come up with a handful of different ways to cool wort quickly.  If you are going that 2.5 gallon batch route, you keep on doing what you been doing!
  • No Chill - A method of cooling the wort by transferring it after the boil to a plastic fermenter that can withstand the heat.  The brewer then lets the fermenter sit in the closed environment and pitches the yeast the next day when the wort has cooled down.  This method will sanitize the fermentation vessel. $0 (assuming your vessel can accept 200+ degree wort).
  • Immersion Chiller - A Copper Coil placed in the wort which has cold water run through it.  Copper is a good conductor of heat.  As the cold water runs through the copper coil, heat is transferred from the wort into the water inside the chiller.  Hot water comes out of the chiller and your wort cools down.  Immersion chillers work best when the wort is moving.  This can be done by whirlpooling the wort with your brew spoon, or automtically like Jamil Zainasheff does. ~$70-$130 depending on size and if you employ DIY.
  • Counter-flow Chiller - In this chiller there are two loops of liquid, one inside the other.  A smaller diameter copper tube is housed inside a larger copper (or regular hose) tube.  Wort is siphoned (gravity) or pumped through the smaller inner copper tube while cold water is run through and over the larger, outer tube.  ~$50-$75+ for DIY and ~$200+ for buying from the store 
  • Plate Chiller - Wort is run between a series of conductive plates from one side, as cold water is run in between the plates from another.  Similar to a counter flow as it requires movement of both wort and cooling water.  I believe this also requires a pump to operate - may be possible through gravity.  ~$100+
(Wort Chiller I made with about 40' of Copper and some Garden Hose Adapters)

Recap - So you now know that you need the following for items to move to all grain beer making:
  1. Larger Brewing Vessel
  2. Burner or Heatstick 
  3. Mashing Vessel
  4. Way to cool the wort.
For the money conscious brewer, go out and get yourself a five dollar bag and make some 2.5 gallon batches!  If you want to stick with 5 gallon batches, look to spend about $200-$250 to get into All Grain brewing.  You can always buy bits and pieces here there until you have everything required to make the jump.

Going All Grain Series - Whats on Tap:
Part 3 - All Grain Wants

Wednesday, March 7, 2012

Going All Grain Series - Part 1 - What is All Grain?

A friend of mine sent me an email asking about what was needed to get into All Grain (AG) brewing.  I sent a lengthy reply, but thought that some of this info could be helpful to other homebrewers out there.  In this three part series I hope to discuss what AG brewing is and why to, or not to, do it.  In addition, I will discuss the different equipment upgrades you need vs what you want to effectively achieve your AG goals.  A basic understanding of AG will also help people follow my blog more easily in the future.


Part 1 - What is all grain


All Grain Brewing is the process of producing the sugary wort for your beer from grains rather than extract.  In Extract and Partial-Mash brewing, all or a large portion of your sugars come from a dry or liquid malt extract.  These sugary extracts come from AG manufacturers who perform a mash with the grain to convert the starches to sugar.  The sugary liquid is then boiled in a vacuum environment to reduce the % of water to about 20% in Liquid Malt Extract (LME) or 0% in Dry Malt Extract (DME).  In Extract you add the powdery DME or Syrupy LME to water to create wort.

For more info on the technical side of mashing, and to provide as a reference for some of the terms I will use from here on out, I highly recommend you get a copy of How to Brew by John Palmer.  (For you cheapos you can read the first version for free online, but realize some info is outdated).

So why brew with grain when you can just use DME or LME? AG provides the brewer with more control over the final product.  Sometimes you want to make a beer where the use of only extracts will not produce an acceptable example of the style.  These beers require certain grains that cannot be steeped.  An example of this would be a Munich Dunkel, whose grist contains a majority of Munich Malt.  Some homebrewer stores sell a 100% munich extract, but it can be tricky to find.  Since you need munich for most of the grist, a partial mash is just not feasible (since you would essentially be making an all grain).

During the mashing process there are different forms of sugars created depending on the mash temperature.  The fermentability of your beer depends on the sugar make up of your wort.  With all grain you can choose the mash temperature and time to create a wort whose fermentability is higher or lower than the average extract.  These can allow the brewer to shape a beer into drier, or maltier depending on the temp.

Another reason to go AG is that it is fun!  Making beer from grains increases my brewday time (by about two hours) and gives me more enjoyment from the hobby.  It also allows for more tinkering and adjusting.  The same reasons I just mentioned can also make AG more challenging to fit into your busy schedule, and more time in recipe design and formulation.  This is a hobby, so do with it what YOU want, Or what your spouse will let you get away with!

Going All Grain Series - Whats on tap: