Monday, January 5, 2015

Indoor Brewery Plans and Existing Brew Setup in House

I feel like I am always mentioning the indoor brew setup, but never acting on it.  Well I got a little bit of time off (Not a fan of calendar year based leave and use/it lose it) at the end of 2014 and decided to really brainstorm what I want and how it will work in my tiny space - Over-analyzing and researching...typical!.  I printed out some graph paper and got to work measuring and drawing things out.  I have always been a fan of using dimensional 2x3 for projects whenever possible (used it for the shelving shown in the pics below below).  For most applications 2x4s are overkill and since space is somewhat tight I plan to use 2x3's for my brewstand to save a few inches.  Below is the scanned drawing.  I tried to get things pretty accurate, and while I acknowledging I am a horrible artist, I think  it came out pretty well.  My Microsoft paint skills on the other hand...not so hot.

Scanned brewery plans
(Brewstand Sketch - for reference countertops are generally 36" high)

There were a few things I really wanted to accomplish with this brewstand:
  1. Small Footprint - I want it to be no larger than a 2' square.  This should be 20"x23"
  2. Gravity Fed - With the kettle ball valve approximately 21" I can just drain into my better bottles (which are 20" tall).  Mash tun gravity fed to kettle just like I do in my typical setup.
  3. Self Contained - I loathe setting up and tearing down outside.  The planned system will allow me to keep things in place when not in use.  The top shelf holding the mash tun will come off when I start the boil
  4. Wood - I definitely understand why a lot of people choose metal for their brewstand, but I prefer wood for aesthetics, cost, and because I have the tools to work with it.
I do plan on adding casters to the stand by incorporating them into a hinged system which will be lockable - wheels disengaged when unlocked.  I will definitely write up a post on the wheel system once I figure it out myself and can explain it more thoroughly.  I have about an eight foot by four foot rectangular area of my basement to incorporate this stand (turquoise to the right) as well as a multipurpose six foot workbench (red to the left).  I need both the bench, and the brew stand to be sturdy (locked in place) but mobile.  The left edge of the workbench puts me next to some tool storage (far right in the second picture below).  I will need to move the bench to get to those tools occasionally, so it will also be on wheels.  I figure I can roll the brewstand toward the the fridge and slide the bench to the right to access the storage on the left.  I am still unsure of whether I will vent outside on the right (dogfishead sign) or straight (flying dog sign)

Workbench and brewstand
(Proposed workbench and brewstand area)
Basement Storage
(Storage area: Tools on left, grain on the right)


I don't have an outdoor storage shed yet, so I have a lot of tools scattered around the tiny unfinished area of my basement.  This area acts a whole-house storage and brewery.  I am in desperate need of a workbench for standard household projects and it will also get a lot of use during brewday once it is all setup.  The bench will most likely take on the functions of a weighing table, racking table, and yeast starter table.  The last picture is of my my kegerator and fermentation chamber.  Oh, you noticed how ugly my fermentation chamber is did you?  You're not alone, Mrs. Shegogue often comments on the lack of visual appeal and constantly asks "I thought you said you were going to get a new one which is smaller and more appealing."  Eh, it works so why fix it?  I just recently added the shelf to house my glassware and find it really handy as I don't have to run upstairs for a glass when I want to sample some fine brew.

Keg and Ferm Chamber
(Kegerator and Fermentation chamber)
So there you have it, the current state of the Shegogue Brew, brew house.  I am still a ways out, but at least we are making some sort of progress rather than just talking about it!

Thursday, January 1, 2015

To-Do List 2015 and Beyond

It is 2015.  I have officially been brewing for five years now and I have a few accomplishments to show for it.  I am not a big fan of "New Years Resolutions."  It is simply societies imposed way of making a should-do list, which never really amounts to anything because it is not a to-do list.  Like anything in life, if you truly want to do it, you will start doing it on your own with no real list necessary.

That being said, it can be advantageous to make a to-do list,and a long-term one at that.! I find that I often get off track feel I am not progressing if I do not have a to-do list to stay focused on my next objective.  The best part about a long-term list is that you don't have to feel the pressure of crossing something off by a certain point in time.  While deadlines can be beneficial, this is my hobby and other things in life are more important.  These other life moments can and will push the "pause button" on my hobbies to-do list.

Okay, now that I have gotten my ideology out the way, I am going to jot down a bunch of things I would like to-do.  I will try and reference back whenever I feel my progress is lacking in the homebrew department.

  • Brew more often - as we saw from my 2014 recap, brewing took a major backseat and I want to change that.  Here are some of my ideas for this:
    • 1 Gallon batches around once a month?
    • Keeping the pipeline full - no empty fermenters
    • Alleviate the impediments to brewing: see Indoor Brewing (below), time, space, setup
  • Indoor Brewing - I have been in the new house a year-and-a-half and only have an induction burner to show for the new brew space.  Below are some to tasks I need to accomplish to reach my goals
    • Utility sink and plumbing
    • Ventilation
    • Brewstand
    • Equipment upgrades
      • induction burner
      • brew fittings/hoses 
      • pump
  • Experimentation -I really want to start testing different brewing aspects so I can learn more about the hobby and keep things interesting.  Experiments are some of the best reads from other brew bloggers, like the Brulospher.
    • Split batch trials - 
      • different yeasts
      • different hops for dry hopping
      • different cooling techniques
      • different fermenting sizes
      • different pitch rates
    • Mash Times
    • Hopping schedules
    • Recipe Development
  • Blogging - I really want to write more for my personal blog... I think I will try and focus less on crafting perfect sentences (I tend to spend a lot of time rewriting lines of posts) and more time on just getting info out there for consumption.
Okay, I realize this has been a rather wordy post, but it is more for me to help define my direction in this hobby and hopefully enable me to produce more timely and interesting content.  Stay tuned and see how I do in 2015 and beyond!

Wednesday, December 24, 2014

2014 Brew Year in Review

As 2014 comes to a close, it marks the culmination of my 5th year of participating in this wonderful hobby of homebrewing.  Though the actual brewing of beer took a back seat due to my deck project, there were noticeable accomplishments.  Back in April I found out the results of my BJCP tasting exam.  Since then I was able to judge a few competitions and acquire enough experience points to receive a Certified designation as a BJCP judge.  I need to judge another 4 competitions to receive enough experience points to qualify to take a different written exam.  If I pass this exam with an 80% or better, I can advance to a National designation.  I usually judge 2 or 3 local competitions a year, so unless I really set a goal to make this happen (travel more than an hour each way to judge) this will be a 2016 accomplishment.


So I did brew some during 2014 - seven batches to be exact.  Unfortunately, I only ended up thoroughly documenting two of them, ouch!  I promise to do better with this in 2015.  I also plan to brew more since I have the ingredients!

Batches Made in 2014

  1. Belgian Pale Ale - Probably the best beer I made all year.  Wonderfully balanced
  2. Session IPA - Extract batch, came out OK.  Briefly discussed the recipe here.  Nothing to write home about
  3. Wrong Coast 2 - Made my IPA for the deck party.  Discussed in this post along with the Witbier below
  4. Witty Welker - Made a slightly modified version of this witbier for the deck party
  5. Cider - Made a batch of cider.  Used WLP002 and added a half gallon of apple juice back to the keg to add sweetness
  6. Oatmeal Stout - actually documented this one!
  7. Belgian Golden Strong Ale - 5 year anniversary brew with Josh.  We brewed this on Dec 21st and I do plan on writing about it once it is ready for tasting in 2015.
And last but not least, I did write an article for Homebrewtalk.com and plan do to do more in the future.  Keep an eye out for me on HBT and I will occasionally link to the content over there, on here.

Merry Christmas and a Happy Brew Year!

Saturday, December 6, 2014

Not Worthy - Oatmeal Stout

Back in October I set out to brew an Oatmeal stout.  With the weather turning colder I knew I would appreciate a dark and malty beer.  I had a Founders Breakfast Stout last year and remember it having an amazing aroma of warm oatmeal cookies.  I was hoping to replicate that aroma with toasted oats in this recipe.  I also wanted it to have a very strong chocolate presence without being too roasty.  I definitely accomplished this, but maybe have gone too far - see the tasting notes.

Per usual, my notes for brewday were lacking.  I do recall it going rather smoothly and it being one of my fastest brewdays to date at just around 5 hours.  I ended up fermenting 5 gallons in one of my better bottles and a little under a gallon in a one gallon jug.  When it came time to keg, I also bottled the 1 gallon jar and added pumpkin pie spice.  I have not yet tasted the spice version.

Oatmeal Stout

Brewed On: October 12, 2014
Kegged On: October 25, 2014
Style: 113C - Oatmeal Stout
Batch Size: 6 gallons (5 gal into fermenter)
Efficiency: 75%
OG: 1.056
FG: 1.018
IBU: 30 calculated (Rager) 
ABV: 5.0%
Toasted oats
Yeast: WLP002 64° to start and rised to 67°

Grist Mashed at 154 for an hour
70% - Maris Otter (Muntons) - 9 lbs
4%  - Crystal 120 - 8 oz
6%  - Chocolate (350L) - 12 oz
6%  - Pale Chocolate (200L) - 12 oz
6%  - Victory - 12 oz
8%  - Toasted Oats* - 1 lb


Close up of the toasted oats

* Oats were toasted at 300° for 1 hour were stirred every fifteen minutes

Hop Additions 
0.53 oz - Magnum 14.7% AAU - 60 minutes - 30 IBUs


Water Adjustments
Montgomery County, MD Water - 1/2 Campden Tablet for all brewing water
3 grams gypsum to mash water
3 grams CaCl to mash water

Tasting Notes

Aroma: Moderate roast aroma dominates and is made up of moderately strong chocolate and light coffee.  There are some toasted notes from the oatmeal, but not as pronounced as I had hoped.  No apparent fruitiness or yeast character, and no discernible hop aroma, fairly clean.  No diacetyl.  

Can kinda see those garnett highlights
Appearance: Very dark brown with garnett highlights when held up to the light. Nice dark tan and moussy head with good retention. Good clarity.


Flavor: Moderate malt backbone consisting of moderate chocolate and some light toasted oats.   Moderate hop bitterness and no apparent hop flavor.  The beer finishes ever so slightly dry.  The balance is towards the roasted chocolate malts.

Mouthfeel: Moderately low carbonation, medium body, no alcohol warmth, moderate creaminess, and no astringency

Overall Impression: Overall this is oatmeal stout has dulled in flavor since I first kegged, and tasted it a month ago. The toasted oat aroma was not as prominent as I had hoped for a few weeks ago and has subsided even more today. It is still a very sessionable beer since it is fairly balanced.  Honestly, I don't know if the 3/4 lbs each of chocolate and pale chocolate malts contributed a strong enough roast character for this beer.  Next time I will probably increase the oats and include some roasted barley.

I didnt take time to attribute BJCP points to this, but I would guess somewhere around 28.  It might have been in the low 30s three weeks ago, but it just doesn't make the mark now.  I always am my toughest critic, but I have deemed this beer "Not Worthy" since I don't feel it is worthy of a better name.  :)


Wednesday, November 26, 2014

Saving $ Brewing - Buying Bulk Grains

Last weekend I trekked down to the 3 Stars Brewery in D.C. to pick up the grain I purchased in the local DC Area Grain buy. The grain buy is hosted through the "Group Buy" section on the Homebrewtalk.com forums.

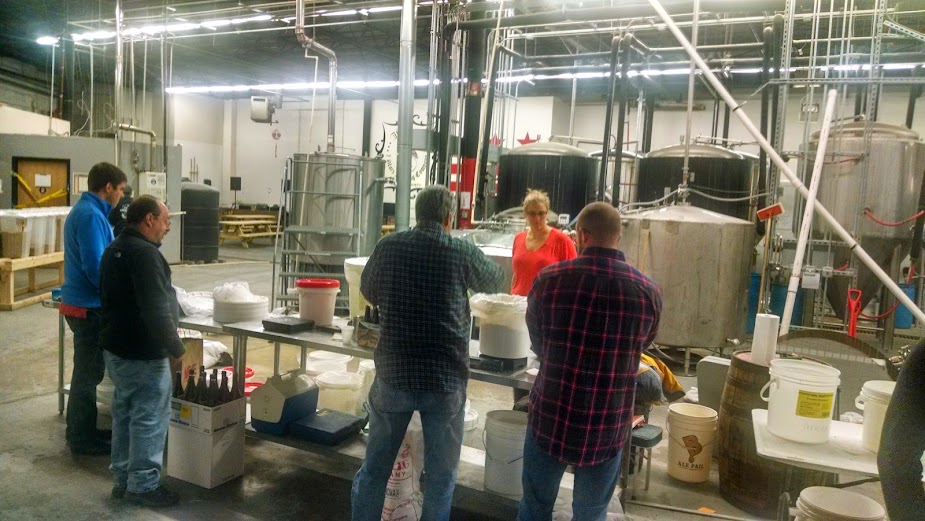
The group started almost two years ago and is only possible by the brewery/brew store's help.  A little history: before this group grain buy, individuals could have accounts with the major malting suppliers and have pallets of grain delivered to their house.  A lot of homebrew clubs would have an account with the malting company and purchase sacks of grain through these accounts.  This changed a couple of years ago when the malting companies up the prices they were charging to homebrewers - any accounts which didn't have a tax ID (EIN) for brewing purposes.  Then, they decided to stop selling to all those accounts not associated with a brewery or homebrews shop completely - we were immediately cut off!  I don't know if anyone figured out what the impetus for this was, but there was much speculation that homebrew shops pushed back on the malting companies because they were losing out on business.  So a big thanks 3 Stars for facilitating the purchase.

Sacks of Grain 1


The group buy takes a few members to organize and handle payments.  The DC group buy utilizes a protected (must receive permission to view the sheet) google spreadsheet.  One person manages all the full sack purchases, and another handles splits - multiple people splitting a 50lb sack of grain which is generally a specialty malt.  As the grain requests reach a pallet or more (~42 sacks), the group decides on a date convenient for the majority of the purchasers and all the buyers send paypal payments to the group organizer.  The group organizer then submits the bulk purchase to 3 Stars and schedules the pickup date.  When organized well, like this buy is, things go very smoothly!

Sacks of Bulk Grain


I arrived a little early on the pickup day with my 55lb scale to help with separating the splits.  The split organizer had labels with everyone's HBT screen name, the type of grain, and the weight they purchased.  These labels were organized for each bag of grain to be split.  There were 4 other groups of people splitting and it all happened in less than 30 minutes.

Split Station

More Splits


After I helped split sacks and loaded up my car, I wandered into the 3 Stars Homebrew shop to purchased some other ingredients for future brews - yeast and fermcaps this time.  I was then back on the road and headed home.


So how much $avings are we talking?


Well first off, purchasing from the group buy gives you a much larger selection of bulk grain options.  A lot of homebrew stores carry only a handful of base malts in full sack quantities.  The group buy offers malt from Briess, Chateau, Crisp, Patagonia, Muntons, Rahr, Simpsons and Weyermann.  So that is an intangible bonus to a group buy.  The brew store I normally go to charges $52 for a sack of basic 2-row.  The European pale ale and pilsner malts are in the $60s range.  When you purchase by the pound, the rates go up even higher!  Two of the grains I bought I can't even buy from my local store without special ordering, so I didn't even include the sack price there.  Gas to get back and forth to both the bulk location and my local brew store is about $6, but since its about the same I wont include that here.


Bulk Store
Sack Cost w/ Shipping Per Lb Cost My Cost Full Sack Cost Per Lb Cost My Cost
Rahr Pale Ale (50lb) $44.00 $0.88 $44.00 $52.00* $2.00 $52.00
Weyermann Bohemian Pilsner (55lb) $53.50 $0.97 $53.50 $64.00* $2.00 $64.00
Weyermann Munich (55lb) $55.00 $1.00 $10.00 x $2.50 $25.00
Weyermann CaraMunich (55lb) $60.00 $1.08 $5.40 x $2.50 $12.50
$112.90 $153.50

* - Estimate based on stock grains, since these are not stock items at my local homebrew shop


After all is said and we are looking at a savings of $40.60, or about 26%, on 120lbs of grain.  Pretty solid! Depending on recipes I should be able to get around 10 different five gallon batches of beer out of this purchase.

Thursday, November 20, 2014

Life of a BJCP Judge - MALT Turkey Shoot 2014

This past weekend I volunteered as a judge for the MALT Turkey Shoot homebrew competition held at the Peabody Heights Coop brewery in Baltimore, Maryland.  The annual competition hosted by MALT (Maryland Ale and Lager Technicians) is a big fall competition for my area.  I judged this competition for the first time last year, where it was also held at Peabody Heights.  I have been told by some veteran participants this competition used to be held at Heavy Seas (formerly Clipper city) and it was always VERY cold!  Last year, the first which the competition was held at Peabody Heights, wasn't too bad, but this year it was pretty cold.  Good thing I wore my coat and hat!  When I arrived (it was high 20s (Fahrenheit) that day?) all the doors were open to air out the smell of beer and cardboard which was permeating throughout the brewery.  As 9am rolled around and we were preparing to judge, the executive decision was made to deal with the smell rather than the cold. Thank goodness!  Everyone seemed to get accustomed to the smell very quickly, but it took a while to warm up.

Whenever you register to judge a BJCP competition you are usually given a choice to state any categories you would, or would not prefer to judge.  I really have no preference as I enjoy most of the styles.  I may, however, request not to do porters and stouts in the future, as I have been assigned to this category for the past 3 competitions. In the morning I got to judge Category 10 - American Pale Ale and American Amber Ales.  In the afternoon I judged the aforementioned mixed Category 12/13 of Porters and Stouts.  In that afternoon session, we had an American Stout which unfortunately ended up being a "gusher."  This beer had a strong clove character, to the point I am almost wondering if it was intentional, and intended as a "Christmas stout."  If that was not the case, than it was an unfortunate infection.

I have been wanting to start publishing some video based content to the blog, but I always forget to record something, or the recording is poor quality.  Enough EXCUSES I say!  I am going to start pushing out some video whether its ready or not.  My hope is to be able to slowly learn/improve on editing and quality as I go - so go easy on this phone recorded video.  This is a quick clip of opening a gusher at a competition.  Occasionally this will happen at a competition and as judges we always request the 2nd bottle to give the entry a fair chance if there was just a single bad bottle.  I had my friend a fellow judge of this beer, Ed, film opening the 2nd bottle.


Monday, November 10, 2014

Fall Updates - I am alive

I think I have given the Deck post an appropriate amount of Top-Blog time.  I have really been slacking with this blog and hope to liven things up with some more frequent postings.  A Few quick updates:

A few shots of my Wrong Coast version 2 which I brewed for the deck party, subsequently consumed all of it, and never blogged about the testing notes...at least I took pictures?


  • I will be judging this weekend at the MALT Turkey Shoot beer competition.  This will be my first competition I am judging where I can official check the "Certified" box on the BJCP Scoresheet.  Looking forward to it!
  • Finally purchased the Avantco IC3500 when it was on sale last month.  I believe I orginally posted about my intentions for buying this cooktop back in August of 2013 when I first blogged about having an Indoor brew space, so it has been a long time coming.  I will be doing some time/temp tests to provide some numerical data for others interested in using this burner.
  • I recently brewed an Oatmeal Stout and will have recipes and tasting notes going up soon
  • I am flirting with the idea of making some homebrew related videos, if so I will post them to the blog.
  • I wrote a guest post for Homebrewtalk.com on the Road to Becoming a BJCP Judge
Another beer I brewed for the party was a witbier.  I add some flour at flameout so it would remain cloudy, which it did for a little while...


And then it sat in the keg for quite a few weeks


Crystal clear!  Oh well, still tastes great!

Plan on posting again soon, so stay tuned :)